
10 Essential Git Commands Every Data Scientist Should Now
(And A Complete 15 min Hands-On Exercise )

I mass-deleted an entire folder of code on my personal computer last year and I sat there staring at my terminal like I’d just dropped my phone in the ocean.
Fortunately, it took me 40 seconds to fix it.
If I hadn’t learned 10 essential git commands, I would still be crying.
And the wild part is that these git commands cover about 95% of everything you’ll ever need to do with version control as a data scientist.
Today I’m going to walk you through all of them with an actual hands-on exercise you’ll do right now, on your computer, in about 15 minutes.
By the end, you’ll have a real Git project with commits, branches, and a history you built yourself.
Why learn Git from the command line?
I know what you’re thinking. “I have GitHub Desktop. I have VS Code’s Git buttons. Why would I type commands like it’s 1995?”
Because those tools hide what’s actually happening.
And when something breaks (and it will), you’re staring at a cryptic error with no idea what went wrong or how to fix it.
Learning git from the command line isn’t scary. It’s just unfamiliar. Like driving stick shift, awkward for a week, then you wonder why you ever needed automatic.
Your hands-on Git exercise starts now
Open your terminal (Mac: Terminal app. Windows: Git Bash). Type exactly this:
mkdir git-playground then cd git-playground
You just created a folder and moved into it. You’re going to turn this empty folder into a full Git project over the next 15 minutes.
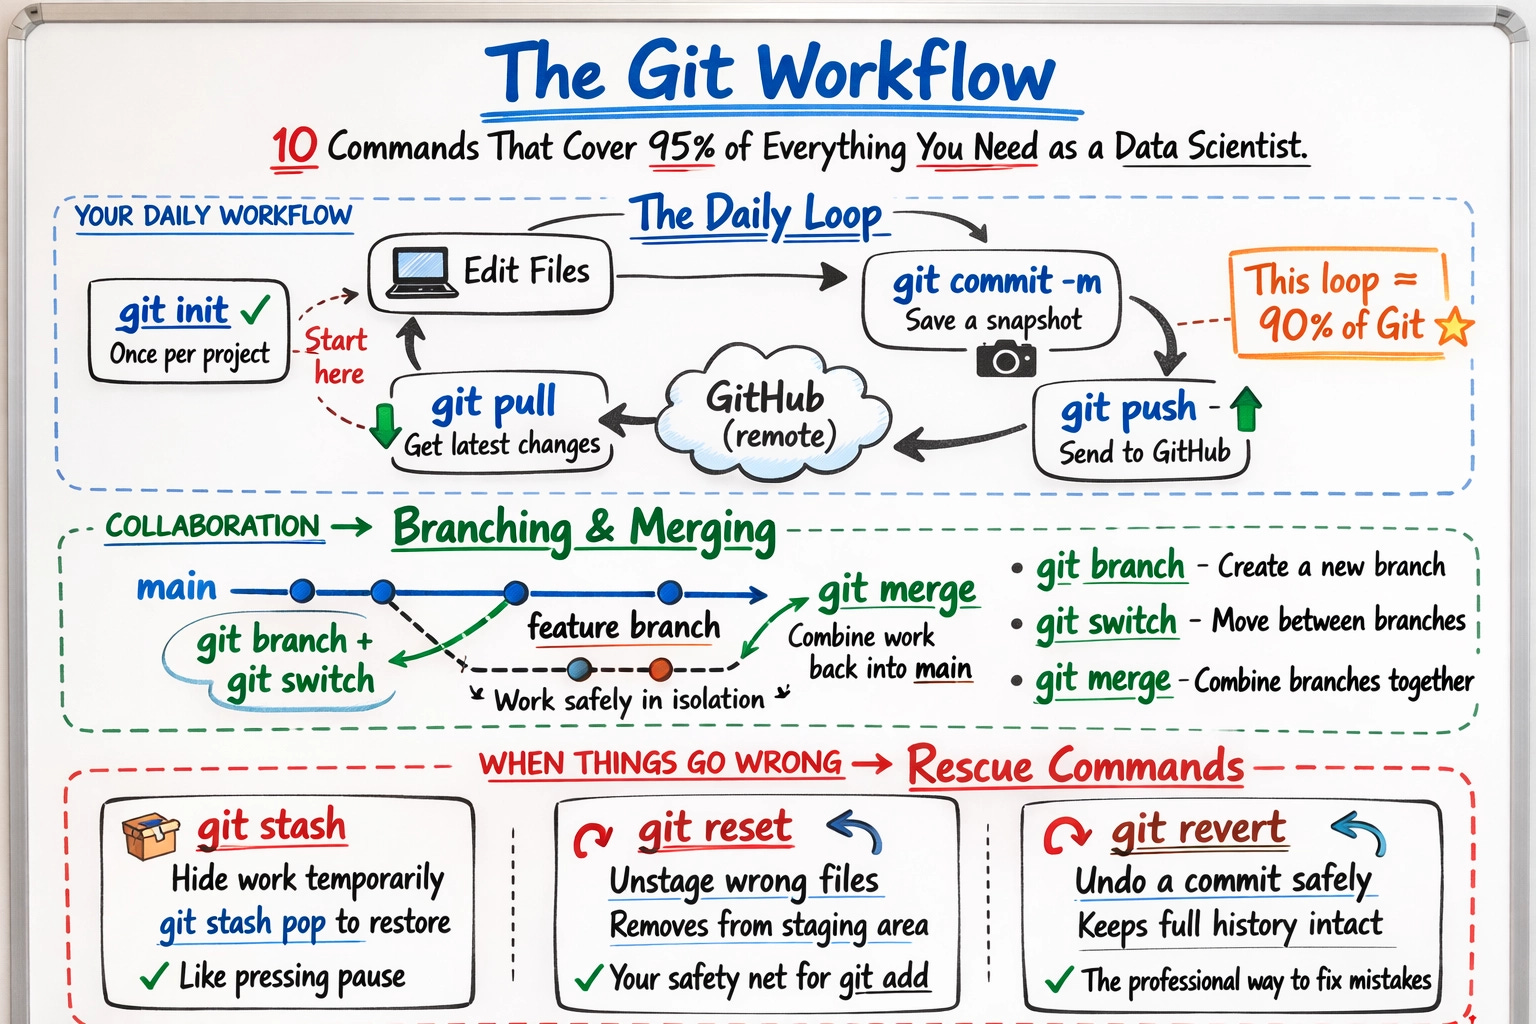
5 basic Git commands you’ll use every day
These five basic git commands are your bread and butter. You’ll use them constantly.
1. git init — Turn a folder into a Git project
git init
You should see:
Initialized empty Git repository in /Users/you/git-playground/.git/
That’s Git saying “I’m watching this folder now.” Every change you make from here gets tracked.
2. git add — Stage your changes
First, let’s create something to track. Make a file:
echo "# My Git Playground" > README.md
Now tell Git you want to include this file in your next save:
git add README.md
Think of git add as putting items in your shopping cart. Nothing’s purchased yet, you’re just selecting what you want to save.
Quick check — run git status and you’ll see:
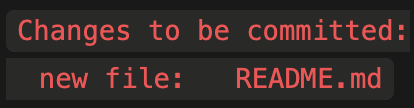
Green text. That means it’s staged and ready.
3. git commit — Save a snapshot
git commit -m "Add README file"
You should see:

This is a permanent snapshot. You can always come back to this exact moment. The -m flag lets you attach a message describing what you did. Make these messages useful. “Fixed stuff” helps nobody, including future you.
4. git push — Send your work to GitHub
Go to GitHub.com, create a new empty repository called git-playground. Don’t add a README (you already have one). Then:
git remote add origin <https://github.com/YOUR-USERNAME/git-playground.git> git push -u origin main
Your code is now on GitHub. Anyone with the link can see it. The -u flag links your local branch to the remote one, so next time you can just type git push without all the extra stuff.
5. git pull — Get the latest changes
git pull
Right now this won’t do much since you’re the only one working on the project. But on a team, this is how you grab everyone else’s changes before you start working. Run it at the start of every session. Trust me.
Here’s the flow you just learned:
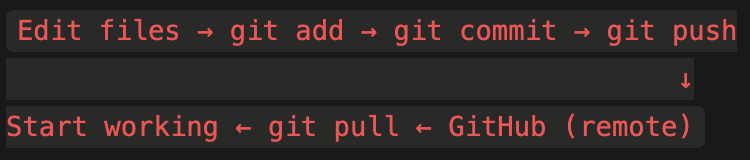
That loop is 90% of what you’ll do with Git. Everything else is for when things get interesting.

3 Git branch and merge commands for collaboration
Real work happens on branches. A branch is a parallel copy of your project where you can experiment without breaking the main version.
6. git branch + git switch — Create and move between branches
git branch add-about git switch add-about
You should see:
Switched to branch 'add-about'
You’re now on a separate branch. Anything you do here won’t touch main until you explicitly merge it back.
Let’s make a change:
echo "This project is for learning Git." > ABOUT.md
git add ABOUT.md
git commit -m "Add ABOUT file with project description"
7. git merge — Combine branches together
Now let’s bring that change back into main:
git switch main git merge add-about
You should see:
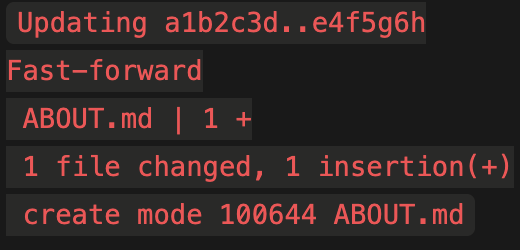
Your ABOUT.md file now exists on main. The branch did its job: let you work in isolation, then merge cleanly when ready.
Here’s what that looks like visually:
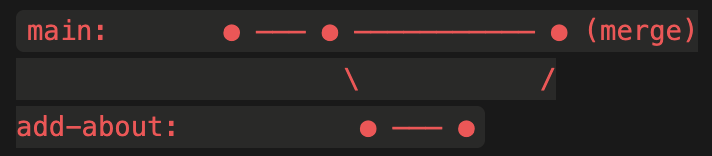
You created a branch, did work there, and brought it back. That’s how every team on earth collaborates with Git.

3 Git commands to undo mistakes without panic
This is the section that pays for itself. Memorize these three commands and you will never lose work.
8. git stash — Hide your work-in-progress temporarily
Let’s say you’re in the middle of something and your teammate says “hey, can you check the main branch real quick?” You don’t want to commit half-finished work. So:
echo "Work in progress - not done yet" >> README.md git stash
You should see:

Your changes vanish. But they’re not gone, they’re stashed. Check your file:
cat README.md
It’s back to its previous state. Do whatever you need on main, then bring your work back:
git stash pop
Everything’s restored. Like you never left.
9. git reset — Unstage files you accidentally added
You know when you run git add . and accidentally stage everything, including that file you didn’t mean to touch?
echo "secret password: 12345" > secrets.txt git add .
Oops. You just staged a secrets file. Don’t panic:
git reset secrets.txt
Now secrets.txt is unstaged. Your changes to other files are still staged. Crisis avoided.
(Pro tip: add a .gitignore file so Git never even sees files like this. But git reset is your safety net when you forget.)
10. git revert — Undo a commit without erasing history
Let’s say you committed something you shouldn’t have:
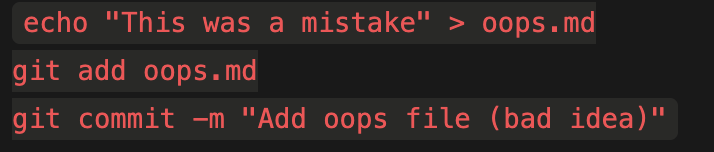
You want to undo that commit the right way. Revert it:
git revert HEAD --no-edit
You should see:

The file is gone, but the history shows exactly what happened: you made a commit, then you reverted it. Clean, honest, traceable. This is how professionals handle mistakes.
Git commands cheat sheet

Next steps
Run this right now:
git log --oneline
You should see something like:
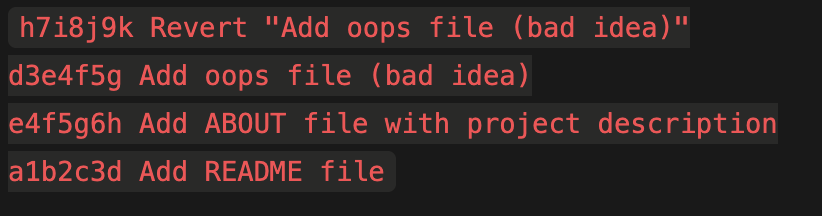
That’s your history. You built it. Commits, branches, reverts, you built all of that in 15 minutes.
Most bootcamps spend a week covering these basic git commands. You just did it while drinking your coffee.
The three commands to learn next:
git log --graph (visualize your branch history),
git cherry-pick (grab a single commit from another branch), and
git rebase (rewrite history like a surgeon).
But these 10 essential git commands you just learned will carry you for months.
Keep Building,
I am begrudgingly coming around to the terminal, including for git commands.
Thankfully, it has been really easy to find cheatsheets and tutorials. I still get really nervous anytime I have to do anything.
Thanks for sharing this, you already covered 99% of work that is used on daily basis
I would like to add few more that has helped me:
- git status - this allows you to see what you are staging or unstaging
- git rm --cached - when you don't want to track any particular file like config or .env file
- git commit --amend - when your commit message has a mistake, no worries use this to replace that and this will be the final commit message for the changes